(колекція інструкцій та підказок)
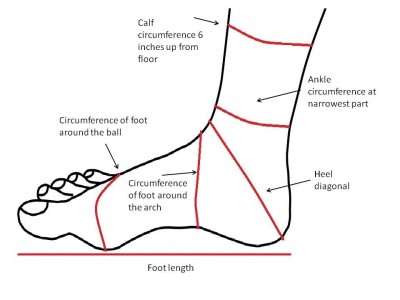
Note: foot circumference refers to measuring around the ball of the foot.
Interesting discoveries:
- In the vast majority of cases, ankle circumference is the same as the foot circumference. The foot circumference is either the same or larger (never smaller), and if larger only by about 5%.
- There is a remarkable correlation between foot length and foot circumference: foot circumference, on average is about 95% of foot length.
- Gusset circumference on average is larger than foot circumference by 10%.
- Heel diagonal is about 35% larger than foot circumference, 25% larger than gusset circumference.
- A standard human leg (if such a thing exists) does indeed get wider about 6 to 8 inches up from the top of the heel, where the calf muscles start to curve out – which is also the usual length of a sock leg. But the majority of calf-length sock patterns keep the sock circumference the same – that is, they are assuming that the sock leg doesn’t need any increases to fit comfortably below that calf curve. However, what I learned was that in nearly 50% of cases, there’s a significant increases in leg circumference just up from the ankle.
- Calf circumference 6 inches up from the ground: 12% larger on average but there was a huge variance – for some, up to twice to size. For 15% of respondents, it’s the same or smaller; 40% it’s 1-10% larger than ankle; for 30% it’s 10-20% larger; for 18% it’s even larger.
WHAT THIS MEANS FOR SOCK PATTERNS
This particular data point was known to me before I started the survey: in fact, it was why I started the survey. Looking at men’s and women’s shoe sizes individually, the difference between the largest and smallest common sizes (e.g. women’s size 5 to 11 and men’s size 6 to 12), there’s a 25% difference in both length and foot circumference. That is, a women’s size 11 shoe is over 20% larger in both width and length than a women’s size 5 shoe; and the same difference exists for men’s size 12 compared against men’s size 6.
Although knit fabric does stretch, you can’t expect one size sock to fit that range of sizes with equal comfort, and to look equally good.
WHAT THIS MEANS FOR SOCK KNITTERS
Rather remarkably, you can guess the rest of the foot measurements based on one: as long as you have foot length, ankle circumference or foot circumference, you’re good.
If you have the foot length:
Foot circumference, ankle circumference = foot length * 1.05.
Gusset circumference = foot length * 1.16
If you have the foot or ankle circumference:
Foot length = foot/ankle circumference * .95
Gusset circumference = foot/ankle circumference * 1.10
A sock is best worn with about 10% negative ease.
Standard Human Measurements
While feet can vary greatly in size and shape, some general guidelines can help you understand the typical measurements for “standard” feet:
- The foot circumference and ankle circumference are usually similar in size.
- The gusset circumference is typically 10-15% larger than the foot circumference.
- The lower-calf circumference should not exceed 30% larger than your foot circumference.
- The heel diagonal circumference is usually about 30-40% larger than the foot circumference.
- Adult toes are typically 1 3/4-2 1/4″ (4.5-5.5 cm) long.
Negative Ease
Negative ease concerning socks means that the finished sock circumference measures smaller than the intended wearer’s foot circumference. The importance of negative circumference and length is crucial to how well a sock will fit. If you knit your sock to your exact measurements, you’ll have ill-fitting socks that won’t stay on and won’t support all the foot contours, leaving floppy glops of fabric. Socks also loosen up over the day, particularly with natural fibers, to keep them cozy and on your feet, ensuring you add negative ease. Loose socks also face added friction, causing those precious hand-knit socks to wear out sooner than they really should.
To achieve the right negative ease for your socks, follow these general guidelines:
- Adult socks: When knitting adult socks, you should have 1″ / 2.5 cm negative ease in the foot and calf circumference & 0.5″ / 1.5 cm shorter than the foot length.
- Children’s socks: When making socks for children, you should have 0.5″ / 1.5 cm negative ease in the foot circumference and calf & 0.25″ / 0.63 cm to 0.5″ / 1.5 cm shorter than the foot length.
If you follow these guidelines for negative ease, you’ll find you’ll have a much better fit and wear for your hand-knit socks, regardless of the pattern. Most sock patterns base their finished size on the foot’s circumference as your working rounds can easily adjust the leg and foot length.
When you stumble across patterns that say “small, medium, large” or will fit a lady’s size 8, tread with caution if the actual size isn’t listed. You won’t know what the finished measurements are, and getting a proper fit is the end goal. If it doesn’t contain the finished sock measurements, you’ll be able to calculate a rough estimate by dividing the stitch count by the number of stitches per inch in their gauge (usually listed in stockinette). The total will equal the sock’s circumference for a stockinette sock. This rough estimate doesn’t take into account any cables or lace stitches that may be in the sock pattern, which causes it to be smaller (cables cinch in) or larger (lace opens up) – things to keep in mind!
______________________________________________________________________________
2. calf:
kilt socks or kilt hose. They usually have calf shaping worked in to the pattern that you can adapt to other patterns
knitting knee highs, by Barb Brown
звуження можна робити по центру ноги ззаду (в одному місці)
__________________________________________________________________________
3. heel flap:
The heel flap will ALWAYS be 1/2 of your total number of stitches.
Another thing to remember about the heel flap is its length. It must be long enough for you to pick up the correct number of stitches for the gusset. Well how do you figure this, you ask? Easy…
Every row on the heel flap begins with a slip stitch. On the knit row you will slip the first stitch and on the purl row you will slip the first stitch. So how do you figure the number of rows?
______________________________________________________________________
4. heel turn:
Divide the number by 3 in your head. So if you have 30 stitches on your needles, mentally divide by 3 = 10.
Your set up row will be like this: knit across the first 2/3 (20 stitches), then slip one, knit one, then pass the slipped stitch over the knit stitch, turn.
Next, slip the first stitch, then purl across the middle 1/3 (10 stitches), purl two together, turn.
Next, slip the first stitch, then knit across the middle 1/3 (10 stitches), slip one, knit one, pass slipped stitch over, turn.
You will notice that there is an equal number of unworked stitches on each end of the needle.
You will continue working the stitches back and forth until you have worked all stitches.
Okay, what about 32 stitches? How do you divide that evenly? Again, mentally divide by 3 = 10 with 2 left over. You will always want to work on even numbers, so add those 2 stitches to your middle 1/3. 10 – 12 -10 . This will make your unworked stitches even on each end. It is really annoying to have an extra stitch left over after you have worked all your stitches.
After completing the heel turn, you will pick up your gusset stitches and continue as described above until you reach the toe area.
_____________________________________________
5. gusset:
First, remember that the number of picked up stitches for the gusset on each side of the sock must be 1/4 of the total number of stitches cast on. So if you cast on 60 stitches, then the number of picked up stitches on each side must be 15 stitches each. Also keep in mind that the slipped stitches at the beginning of every row on your heel flap will cover two rows. In order to have the correct number of slipped stitches on each side of your heel flap you will need to knit 30 rows.
This same rule will apply to other cast on number of stitches: 64 stitches = 32 stitches for the heel flap and 32 rows so that you will have 16 stitches available to pick up in the gusset area.
*I like to pick up one or two extra to help avoid a hole. There’s a trick to this: don’t pick up in the “corner,” but rather continue in the straight line, up a little bit into the leg of the sock. Much tidier: no hole!
* Work a round to settle and tidy up the picked-up stitches.
Gusset stitches
When you pick up the gusset stitches, you will have to reduce them down to 1/4 of your total number of stitches. You do this by decreasing every other round. This makes the gusset area large enough to go over the largest part of the foot and then reduces it to accommodate the foot area.

Eye of Partridge Stitch (version for heels)
- Row 1: (Right side) * Sl1, K1*, repeat across, ending with K1.
- Row 2 and all even rows: Sl1, purl across row.
- Row 3: Sl2, * K1, Sl1,* repeat across row ending with K2.
- Row 4: Repeat Row 2.
This pretty knitting stitch offsets the slipped stitch every other row, which results in a diamond pattern.
_________________________________________________________________________________
6. ніс шкарпеток:
__________________________________________
загальне:
winwick mum sockalong (christine perry. Sock Along)
базові інструкції, від початку до кінця (добре та зрозуміло написані)
slip-slip-knit
(бо весь час забуваю)
kitchener stitch
finchley graft
three needle bind-off (You need to turn your sock inside out when using this method)
kitchener stitch, дуже просто!
Weaving in Ends in Socks
Ann Budd. Getting Started Knitting Socks // Interweave publ.
Коментарі